Bynder Guide
Bynder General User Guide
Table of Contents
Logging into Bynder
- Go to https://dam.jmclaughlin.com/login
- Log in with your credentials
- If you do not have access, contact the DAM admin

Navigating the Dashboard
After logging in, you'll see the Bynder dashboard. Here's a quick overview:
- Search Bar: At the top for quick asset lookup
- Home: Homepage Landing
- Assets: Where all the fun stuff happens.
- Collections: Curated groups of assets for campaigns or teams
- Upload Button: Top right corner for uploading assets

Let's dive by clicking into the Assets tab—here you'll find all of the content currently on the platform
- Smart Filters: On the left to narrow results by Asset Type, Department, Product Information, Date, Usage Rights, Tags, and Advanced
- Upload Button: Top right corner for uploading assets

Searching for Assets
Use the search bar with keywords, product names, campaign codes, tags, and most importantly, metadata—more on this in a second. You can also:
- Use filters like Asset Type, Sub-Type, Date Range, and Tags
- Click on a collection to browse grouped assets by theme
- Preview files by clicking on a thumbnail
Understanding Metadata
- Metadata includes the descriptive tags, keywords, or details assigned to an asset to help identify, organize,
and retrieve it. Common fields include:
- Asset Type: Photo, Video, Document, etc.
- Sub-Type: Editorial, On Figure, Store Imagery, etc.
- Department: E-Commerce, Marketing, Social, etc.
- Tags: Optional keywords to improve searchability
- Usage Rights: Defines where and how an asset can be used
- Why is Metadata so important?
- Enhanced Searchability: Without metadata, finding assets in a DAM is like searching for a needle in a haystack. Metadata enables robust search functionality by allowing users to locate files through keywords, filters, and advanced searches. Example: Searching for “Spring Campaign 2025 social media graphics” becomes effortless if assets are tagged appropriately.
- Improved Organization: A DAM with well-applied metadata creates a logical structure for storing and accessing assets. Categories, tags, and hierarchical taxonomy help users quickly understand what an asset is and how it relates to others. Example: Grouping assets by campaign or file type lets marketers find what they need without sifting through unrelated files.
- Efficient Collaboration: Metadata provides context for assets, enabling team members to understand how, when, and where they should be used. This prevents miscommunication and ensures alignment across departments. Example: An asset tagged with “Approved for Web Use” signals it's ready for deployment without requiring back-and-forth clarification.
- Rights Management and Compliance: Metadata fields like usage rights, expiration dates, and licensing information help teams avoid legal risks and copyright violations. Example: If an image is tagged with “License expires January 2025,” it ensures the team stops using it by the due date.
- Usage Rights: Defines where and how an asset can be used
- Best Practices for Metadata Attribution
- Standardize Metadata Fields: Ensure all users follow a predefined structure to maintain consistency.
- Leverage Controlled Vocabularies: Use dropdown menus or pre-set tags instead of free-text fields to reduce errors.
- Final Thoughts: Metadata as the Backbone of Your DAM
- Without metadata, your DAM risks becoming a cluttered, disorganized storage solution. By attributing assets with clear and consistent metadata, you enable the DAM to deliver its full potential—empowering users to work efficiently, collaborate effectively, and maximize the value of your organization's digital assets.
At first, it may feel like attributing this metadata is extra work and possibly even tedious, but the more we use Bynder, the more I hope you'll see it as a strategic investment in making our content accessible, actionable, and impactful.
Downloading Assets
- Select the asset(s) you want to download
- Click the Download icon or choose "Download Preset" (e.g., Web, Print, Social)
- Confirm file format and size, then click Download
Uploading New Assets
Quick note: only a handful of users will have permission to upload. If you think you should have permission to upload assets please contact the DAM admin
- Click the Upload button in the top right
- Select files from your computer
- Fill in required metadata fields like Asset Type, Sub-Type, Department, Month, Year
- Submit to add the assets to the library (moderation may apply depending on your role)
Bynder Upload Guidelines
Merchandising, Photoshoots & Social
We're encouraging all internal and external contributors to transition away from third party storage solutions like Dropbox and instead begin uploading directly to Bynder.
Uploading to Bynder (Logged-In Users)
For team members with login access:
- Log in at https://dam.jmclaughlin.com/login
- Click the "Upload Media" button in top right-handed corner
- Select files and complete required metadata
Uploading via External Uploader (No Login)
External partners should use the drag-and-drop uploader at the same link above. Scroll down to the "Drag & Drop your files here" section.
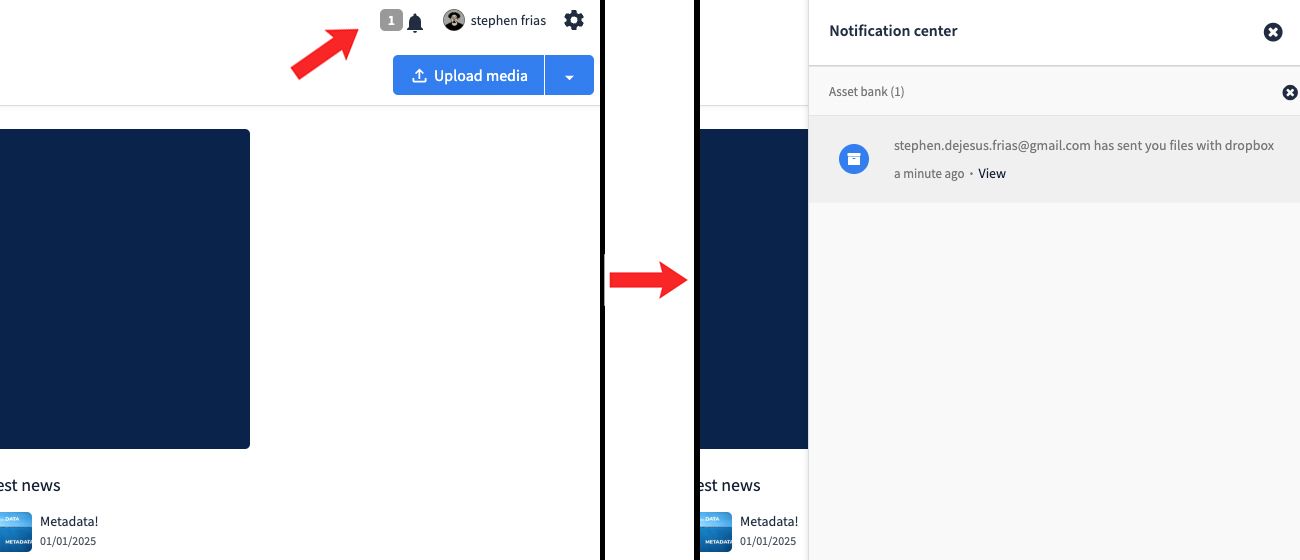
What Happens Next
- The uploader fills in sender/recipient info and completes CAPTCHA.
- The recipient receives both an in-platform and email notification.
- Assets go into Bynder's moderation queue.
- The recipient approves the files and adds metadata.


Metadata Requirements
- Required for all uploads: Asset Type, Sub-Type, Season Code, Month, Year
- E-Commerce: Photo, Editorial/On Figure, Dept: E-Commerce, Status: Unretouched, Photographer, Model, Campaign
- Marketing: Photo, Social, Dept: Marketing, Photographer, Model, Campaign
- Social: Photo/Video, Editorial/On Figure, Dept: Marketing, Influencer, Campaign
Store / Visual
Store photos should be submitted by DMs twice per year (Spring/Summer and Fall/Winter). Please use Bynder for all uploads moving forward.
Uploading via External Uploader (No Login)
DMs should use the external uploader at:
Assets will be sent to Blair for review and moderation.
Upload & Moderation Process
- The DM fills in sender/recipient info and completes CAPTCHA.
- Blair receives both an in-platform and email notification.
- Assets go into Bynder's moderation queue.
- Blair then approves the files and adds metadata.


Metadata for Store Imagery
- Asset Type: Photo
- Sub-Type: Store Imagery
- City, State
- Month, Year